Release: 31-03-2010
- Customized targeting
- Targeting to city population ranges
- Problem with adding category to placements on publisher account
- E-mail addresses in period reports
- Deleting categories using checkboxes
- Link to definition of statistics in the footer
- Change concerning non-additive statistics in period reports' add/edit section view
- The default country for geotargeting has changed
- New pre-defined values in screen resolution targeting
 Customized targeting
Customized targeting is the successor of numerical targeting in a new and more user-friendly way. The aim of introducing customized targeting was to give you more control but at the same time also easier management of your numeric variables that you target to on your advertising space.
Definition of the available variables for customized targeting
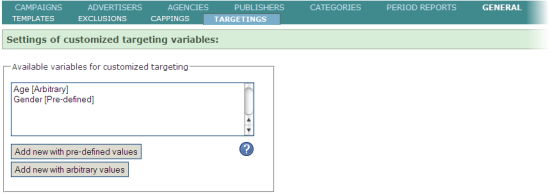
The first step of using customized targeting is to set up the list of available numeric variables of your web portfolio under "ADMINISTRATION" main tab's "GENERAL" menu and "TRAGETINGS" submenu. On this page you can see the list of available variables for customized targetings. These variables can have either the type of "pre-defined" or "arbitrary". The difference between these is the range of values expected in the AdOcean placement codes.

Pre-defined variables are good for such cases when the possible values are limited in number and you expect specific input via the variable. A good example for this is when you use customized targeting for user-related information and you would like to target to the gender of a user. In the placement codes you would pass on for example "1" for the "usergender" variable if the particular user is male and "2" if the user is female. In this case, you have 2 possible values for the gender variable ("usergender"), the information is, so to say, 'pre-defined'. In case of pre-defined values you will be able to constitute the possible values with labels and when you edit later a customized targeting expression, you will see for instance "Male" and "Female" in the list of available values instead of writing targeting expressions like "_usergender==1" or "_usergender==2".
Variables with arbitrary values on the other hand can have a wide range numbers as result. The best example for such variable is the age of the user or the year of birth (where possible values start from usually 1900 and last up to the current year). When using such numeric information it makes no sense to label all of the possible values, the numbers are informative enough.
To set up the numerical variables which you use in your AdOcean placement codes, you have to click the "Add new with pre-defined values" or the "Add new with arbitrary value" button under the list of available variables, depending on what values you would like to target to with a particular variable.
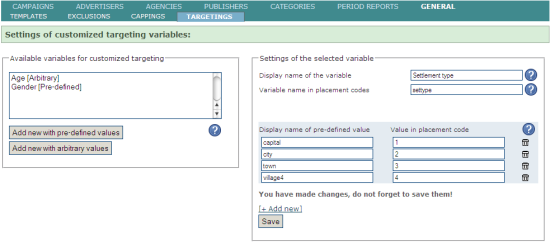
For example, if you have information about your users concerning the type of the settlement they live (for the sake of simplicity, let's assume it can be only a choice of: capital, city, town or village) you need to create a variable with pre-defined values. When you click the "Add new with pre-defined values" button, a new interface part will become visible on the right side. This is the place where you can enter information about the variable. You need to provide a display name for it which will be visible for you when set up a customized targeting for an order later. You also need to enter the name of the variable as it will be present in your AdOcean placement codes in the source of your web pages. Warning: if you do not enter the variable name correctly then your targeting will not work!
Next, you need to click "[+ Add new]" to add the possible values of the variable. For every value you need to provide a display name (this is how you will see it represented when editing customized targeting for an order) and the related value which will be present in the placement code. If the "capital" settlement type is saved by the numeric value of "1" in your user database and you insert this value in the AdOcean placement code as well if the given users lives in a capital city, then the first entry would be "capital" as the "Display name of pre-defined value" and "1" as the "Value in placement code". The rest of the possible, pre-defined values have to be created in the same way. After you created every entry, you need to click the "Save" button. The newly created customized variable will appear in the list of available variables on the left side of the view.

When you edit the settings of a variable with arbitrary values then you also have enter the display name and the name of the variable as it is inserted in your AdOcean placement codes. However, instead of entering display name and value pairs for such variable, you only have to provide the range of numbers that may be assigned to the variable. The range can be entered in the "Accepted range of values" field in the "X:Y" format, where X is the smallest and Y is the largest possible value.

If you need to change the display names or possible values of any variable, you only need to click on its name in the list of "Available variables for customized targeting" and its settings will be loaded on the right side of the view.
Setting customized targeting expression for an order
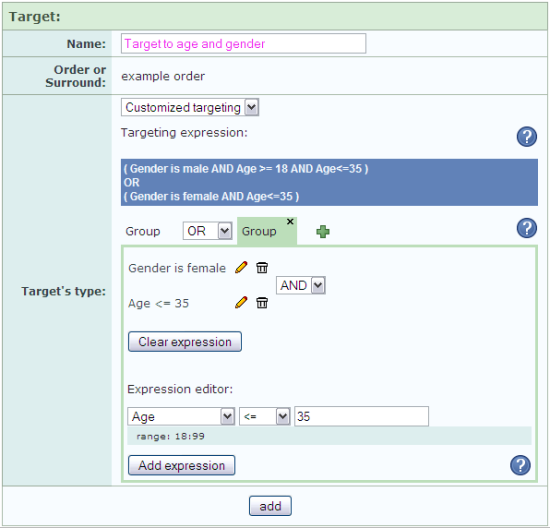
Select a campaign and an order in it where you would like to target the advertisement based on a numeric variable. Go to the editing view of the order then click the "add target" button. In the "Target's type" section, please select "Customized targeting" from the drop-down list. In the view of this targeting type you see the following information, from the top to the bottom:
1) Targeting expression
This is the place where you have an overview of the complete targeting expression that has been set. Targeting expressions may include 1, 2 or 3 different group of expressions which may be connected with the "AND" logical operator or the "OR" operator.
2) Groups
In every expression group you may add several conditions. Every condition (part of expression) may be also connected with the "AND" or the "OR" operators. Expressions in the same group will be evaluated together in contrast to expressions from other groups, which will be evaluated separately (this is also emphasized in the interface by grouping the expressions in brackets if they belong to the same expression group).
To add a new group, you have to click the green "+" (plus) icon next to the last "Group" tab. You can also delete a group of expressions with the small black "x" in the top right corner of the "Group" tab. Please note that the first group can never be deleted. If you have 2 or 3 groups then you will see a drop-down list between their tabs, in which you can select the relation between them.
3) Expression Editor
At the bottom you can see expressions of the currently selected "Group" tab. In this part of the view, you can select one of the available variables for customized targeting, set the mathematical operator to compare the value that will be passed on to the placement code and the value that you intend to target to and set the targeting value that will be compared to the numeric variable's actual value in the placement code (which changes during every request to the placement). When you are finished by setting a condition, click on the "Add expression button" to add it to the group's expressions.
You can delete certain expressions in a group by clicking the trash bin icon next to it, or you can also delete all expressions in the selected group by clicking the "Clear expression" button. If you need to edit an already existing expression element in the selected group then click on the pencil icon next to it.

When you have finished with setting up a customized targeting, please click the "add" button, as usual.
Important note: customized targeting cannot be edited after it has been added. In case you discover something that should be changed, you will need to delete the customized targeting and then construct it again completely.
You can still set numerical targeting expressions in the old way, via the "Geographical" targeting type's interface, if you need to set even more complicated expressions than what you can achieve by using the new customized targeting type.
 Targeting to city population ranges
We have added a new targeting type called 'Population' which allows you to target to cities (based on the size of the population) or to villages.
Problem with adding category to placements on publisher account
We have fixed the bug concerning the add/edit placement views on publisher accounts with trafficking. Now it is possible to add categories to a placement using this view. Up to now it was only possible to assign a category to placement(s) using the category edition views (and only such categories which belonged to the publisher account).
E-mail addresses in period reports
We've fixed a bug concerning period reports' add/edit views, accessed from 'PERIOD REPORTS' submenu of:
- a publisher's properties
- an advertiser's properties
- an agency's properties
This bug did not concern the main 'PERIOD REPORTS' menu.
Deleting categories using checkboxes
We have added the possibility to delete more then one category at the same time (using column with checkboxes).
Link to definition of statistics in the footer
We have added a link to the pop-up window with definition of statistics to the footer.
Change concerning non-additive statistics in period reports' add/edit section view
In case of having the following settings for a report section:
- time of data: absolute time or relative time
- detailed by: without division - the whole period
The default country for geotargeting has changed
The default country for geotargeting is from now on the country which is assigned to your AdOcean account. Before this change Poland was default country.
New pre-defined values in screen resolution targeting
We have added new screen resolutions to the system-defined list for screen resolution targeting.
